Tuesday 16 April 2024

So Much Thanks

Welcome
Today's card featured the new stencil from A Colorful Life Designs called
This stencil is a fun, unique one to work with and is a larger size for those that work on a bigger scale.

So, here's what I did to create my card.
  • I began by putting the Rotating Rings stencil over a piece of white cardstock and inked it with some Villainous Potion Distress Oxide ink.
  • I removed the stencil, wiped it off, then repositioned it and inked with some Peacock Feathers DOX ink.
  • Next, I cut a circle from the stenciled card panel and glued it onto a purple die cut circle that was just a bit bigger.
  • I die cut the sentiment from some purple paper and splattered the letters with my white Posca pen.
  • I glued the card front onto a piece of purple cardstock, then onto a white A2 sized card base.
  • I used some foam tape to put the circle back into position over the front panel, then glued the sentiment letter over it.

Here is the stencil I used:

Discount Code for A Colorful Life Designs
(Affiliate with no extra cost to you) 

Thanks so much for coming by and taking a look.

Adding my card to these challenges:
Simon Says Monday- MAKE YOUR OWN BKG
Crafts Galore Encore- ANYTHING GOES

Supplies
Stamps- NONE
Inks- DOX
Paper- heavy white (Scribes Nook- Waterloo, Ont.)
Accessories and Tools- stencil (A Colorful Life Designs); white Posca pen;
Infinity Circle die (Hero Arts); sentiment die (Concord and 9th)

Saturday 13 April 2024

Hooray!

Welcome
Today I've got a fun card that features the new for April stencil from A Colorful Life Designs called
It sure is a good one to use.

So, here's what I did to create my card.
  • I put the Puzzle Pieces stencil over my white cardstock and then inked it up with some Villainous Potion Distress Oxide ink.
  • I lifted the stencil off, cleaned it and repositioned it to the open white areas, then inked again but this time with some Uncharted Mariner DOX ink.
  • Next, I splattered with my white Posca pen and set aside to dry.
  • I die cut the HOORAY sentiment 4x's from some white cardstock, then inked one up with the same colours as the background.  I die cut the sentiment shadow with a piece of vellum and glued them all together.
  • I glued the stenciled panel onto a piece of white cardstock, then a piece of purple and finally, onto an A2 sized card base.
  • I glued the sentiment across the front to finish off my card using some foam tape.

Here is the stencil I used:

Discount Code for A Colorful Life Designs
(Affiliate with no extra cost to you) 

Thanks so much for coming by and taking a look.

Adding my card to these challenges:
Addicted to Stamps and More- DIE CUT &/or STENCIL
Word Power- SENTIMENT IS FOCUS

Supplies
Stamps- none
Inks- DOX
Paper- heavy white (Scribes Nook- Waterloo, Ont.)
Accessories and Tools- stencil (A Colorful Life Designs); blending Brushes;
HOORAY die (Taylored Expressions); white Posca pen

Friday 12 April 2024

Masculine Birthday


Good Morning
Meet the new for April stencil from A Colorful Life Designs called
This is a simple stencil but it is perfect for layering with other stencils or I just used it to make a fun pattern.  

So, here's what I did to create my card.
  • I put a piece of white cardstock onto my Make Art Station and placed the Rocks stencil over that.  I inked it up with some Uncharted Mariner Distress Oxide ink.
  • I lifted the stencil off, cleaned it and then repositioned it over my cardstock.  This time, I inked with some Villainous Potion DOX ink.  
  • I removed the stencil, splattered with my white Posca pen and set aside to dry.
  • Next, I inked up a piece of white cardstock using the same DOX inks as mentioned above and die cut the sentiment.  I also die cut the sentiment again with some white cardstock, glued them together being sure to offset them so the sentiment would show up against the background.
  • I glued the stenciled card front onto a piece of white cardstock, then used some foam tape to pop it up onto an A2 sized card base.
  • I glued the sentiment into the center to finish off my card.

Here is the stencil I used:

Thanks so much for coming by and taking a look.

Adding my card to these challenges:
Addicted to Stamps and More- DIE CUT &/ OR STENCIL

Supplies
Stamps- none
Inks- DOX
Paper- heavy white (Scribes Nook- Waterloo, Ont.)
Accessories and Tools- stencil (A Colorful Life Designs); Make Art Station (Ranger);
blending brushes; white Posca pen; die (Amazon)

Thursday 11 April 2024

Big Hello!

HELLO!
Today's card is a fun one that I did by combining 2 newly released stencil from A Colorful Life Designs called

So, here's what I did to create my card.
  • I put the Rocks stencil over the Four Squares stencil on a piece of white cardstock.
  • I inked it up with some Fossilized Amber Distress Oxide right into the middle of the panel.  Next, I inked with some Ripe Persimmon DOX ink on either side and finally, added some Picked Raspberry DOX ink along the outer edges.  What a fun pattern it created!
  • I removed the stencils and die cut the HELLO right from the middle of my stenciled card front.
  • I wanted to do an eclipse technique using the letters, so I die cut them again 3x's with white cardstock and glued them all together, adding the stenciled ones on the top.
  • I glued the stenciled panel onto a piece of orange cardstock, then onto a piece of red and then onto an A2 sized card base.
  • I glued the HELLO letters back into place on the card front.
  • The last step was to add some bling around the sentiment.

Here are the stencils I used:


Discount Code for A Colorful Life Designs
(Affiliate with no extra cost to you) 

Thanks so much for coming by and taking a look.

Adding my card to these challenges:
Addicted to Stamps and More- DIE CUT &/or STENCIL

Supplies
Stamps- none
Inks- DOX
Paper- heavy white (Scribes Nook- Waterloo, Ont.)
Accessories and Tools- stencil and Bling (A Colorful Life Designs); Blending Brushes; 
die (Concord and 9th)

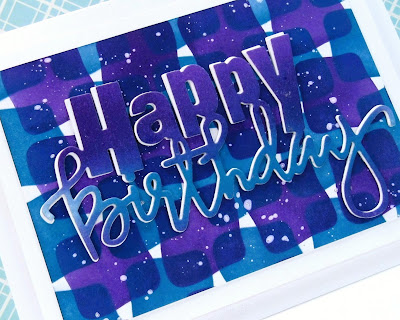
Sunday 7 April 2024

Birthday Fun


Good Morning
Today, I decided to make a monochromatic card using the new for April stencil from A Colorful Life Designs called

So, here's what I did to create my card.
  • I placed a piece of white cardstock onto my Make Art Station and placed the Four Squares stencil over that.  
  • Starting at the center of the stencil, I inked it up with some Villainous Potion Distress Oxide ink.
  • Next, I inked the outer edges using some Wilted Violet DOX ink.  To add some interest, I went back into the middle area and inked with some Uncharted Mariner DOX ink that gave a bit of contrast.
  • Using the same colours as mentioned above, I inked up a scrap of white cardstock and then used that to die cut the sentiment.
  • I die cut an oval from white cardstock, then glued the sentiment over that.
  • To assemble my card, I glued the stenciled panel onto a piece of pale mauve cardstock, then onto an A2 sized card base.
  • I used some foam tape to add the sentiment over the middle of the panel.
  • Finally, I added some bling around the sentiment.

Here is the stencil I used:

AND DON'T FORGET THE BLING:


Discount Code for A Colorful Life Designs
(Affiliate with no extra cost to you) 

Thanks so much for coming by and taking a look.

Adding my card to these challenges:
Simon Says Wed.- HAPPY BIRTHDAY
Dragonfly Dreams- USE A DIE

Supplies
Stamps- NONE
Inks- DOX
Paper- heavy white (Scribes Nook- Waterloo, Ont.)
Accessories and Tools- stencil and bling (A Colorful Life Designs); Make Art Station (Ranger);
Oval die (Concord and 9th); sentiment die (SSS)

Saturday 6 April 2024

Celebrating With You


Welcome
I am loving this new stencil from A Colorful Life Designs called 
I turned the stencil on the diagonal to create a fun new pattern.

So, here's what I did to create my card.
  • I placed a piece of white cardstock onto my Make Art Station, then put the Four Squares stencil over my card panel on the diagonal.
  • I inked it up with some Ripe Persimmon and some Picked Raspberry Distress Oxide ink.
  • I lifted the stencil off, cleaned it and then flipped it over and inked again using the same colours.
  • I placed the stenciled card panel into my Misti and stamped the flower stem along the side.
  • I rubbed some of the same colours mentioned above, onto a scrap piece of white cardstock and sprayed with water to blend the colours together.  I then stamped the flower head onto that inked scrap and fussy cut it out.
  • I stamped the sentiment over to the side and used some foam tape to pop the flower head into place over the stem.
  • I used my black Posca pen to splatter just over the flower area.
  • I glued the finished card front onto a piece of white, then pink cardstock and finally onto an A2 sized card base.

Here is the stencil I used:

Discount Code for A Colorful Life Designs
(Affiliate with no extra cost to you) 

Thanks a lot for coming by and taking a look.

Adding my card to these challenges:
Simon Says Wed.- HAPPY BIRTHDAY
Seize the Birthday- SPRING FLORAL
As You Like It- CUTE or FLORAL
(to me florals add such elegance and are easy to use on any background)

Supplies
Stamps- Creative Chaos (Visible Image); Celebrate (IO)
Inks- DOX, Versafine Clair
Paper- heavy white (Scribes Nook- Waterloo, Ont.)
Accessories and Tools- stencil (A Colorful Life Designs); Make Art Station (Ranger); 
blending brushes; black Posca pen

Friday 5 April 2024

Four Squares

Welcome
Here's another new for April stencil from A Colorful Life Designs called
I decided to use it to make a monochromatic card.

So, here's what I did to create my card.
  • I placed a piece of white cardstock onto my Make Art Station and put the Four Squares stencil over that, centering it onto the cardstock.
  • Next, I inked it up using Peacock Feathers, Tumbled Glass, Blueprint Sketch and some Salty Ocean Distress Oxide inks. 
  • I removed the stencil and splattered with my white Posca pen, then set aside to dry.
  • I inked up a scrap piece of white cardstock using the same colours as mentioned above, then die cut the sentiment.  I die cut the sentiment shadow from a piece of vellum and glued the two together.
  • I glued the stenciled card front onto a piece of blue cardstock, then onto an A2 sized card base.  
  • I glued the sentiment into the center and added a dark blue gem for the dot on the 'j'.

Here is the stencil I used:

Discount Code for A Colorful Life Designs
(Affiliate with no extra cost to you) 

Thanks so much for coming by and taking a look.

Adding my card to these challenges:
Word Power- SENTIMENT IS FOCAL POINT
Crafty Gals- ANYTHING GOES

Supplies
Stamps- none
Inks- DOX
Paper- vellum, heavy white (Scribes Nook- Waterloo, Ont.)
Accessories and Tools- stencil (A Colorful Life Designs); Make Art Station (Ranger);
TE blending brushes; white Posca pen; die (Amazon)